An example for DI instance lifetime in ASP.NET Core 6 MVC
前言
在 ASP.NET Core 6 的開發框架下, 相依性注入 (Dependency Injection) 是跟以往 ASP.NET MVC 5 有很大不同的其中一項技術.
本篇文章, 主要是模仿參考文件 [1] 的範例, 進行演練.
在經由演練之後, 對於 ASP.NET Core 6 MVC 內建的 DI Container 套件, 也多了一份認識.
基本概念
在 ASP.NET MVC 5 時, 需要用到物件時, 除非有安裝 3rd 的 DI 套件, 一般都是自己 new, 但這樣會造成程式之間的相依性太高, 容易發生改 A 壞 B 的狀況, 且不容易進行單元測試.
在 ASP.NET Core 6 MVC 時, 就強烈建議一定要用 DI, 雖然仍然可以自已 new, 但並不建議自己這樣作. 微軟有提供了一個內建的 DI 套件 (Microsoft.Extensions.DependencyInjection), 用以管理物件的 註冊(register), 解析(resolve), 及釋放 (release) 整個過程的生命週期.
- 註冊: 建立介面與類別的對應, 例如:
AddSingleton<ISampleService, SampleService>();
AddScoped<ISampleService, SampleService>();
AddTransient<ISampleService, SampleService>();
- 解析: 在物件的建構子有引用介面時, DI Container 套件 會自動建立當初註冊時對應的類別物件實體 (instance), 例如:
ISampleService _service;
public SampleController(ISampeService service)
{
    _service = service
}
- 釋放: 依當初註冊設定的生命週期 (Singleton, Scoped, Transient), 進行物件實例的釋放.
所謂的 Singleton, Scoped, Transicent 是什麼呢? 黑暗執行緒在 參考文件 [3] 有作了以下的說明:
- Singleton
整個 Process 只建立一個 Instance,任何時候都共用它。- Scoped
在網頁 Request 處理過程(指接到瀏覽器請求到回傳結果前的執行期間)共用一個 Instance。- Transient
每次要求元件時就建立一個新的,永不共用。
以下就開始作演練吧 !
演練細節
步驟_1: 建立 ASP.NET Core 6 MVC 專案
採用 Visual Studio 2022 建立 ASP.NET Core 6 MVC 專案.
步驟_2: 加入 3 個介面 - ISingletonService, IScopedService, ITransientService
(1) 建立 Interfaces 資料夾 (2) 加入 3 個 Interface: ISingletonService, IScopedService, ITransientService (3) GetCurrentGUID(): 用以識別是否為相同物件實體之用
namespace ASPNeetCore6LifeTime.Interfaces
{
    public interface ISingletonService
    {
        Guid GetCurrentGUID();
    }
}
namespace ASPNeetCore6LifeTime.Interfaces
{
    public interface IScopedService
    {
        Guid GetCurrentGUID();
    }
}
namespace ASPNeetCore6LifeTime.Interfaces
{
    public interface ITransientService
    {
        Guid GetCurrentGUID();
    }
}
步驟_3: 加入類別 - SampleService
(1) 加入 Services 資料夾
(2) SampleService 實作介面 ISingletonService, IScopedService, ITransientService, 及 GetCurrentGUID() method
namespace ASPNetCore6LifeTime.Services
{
    using ASPNetCore6LifeTime.Interfaces;

    public class SampleService : ISingletonService, IScopedService, ITransientService
    {
        Guid _currentGUId;
        public SampleService()
        {
            _currentGUId = Guid.NewGuid();
        }
        public Guid GetCurrentGUID()
        {
            return _currentGUId;
        }
    }
}
步驟_4: 加入 SampleController 及對應的 View
(1) 加入 SampleController
namespace ASPNetCore6LifeTime.Controllers
{
    using Microsoft.AspNetCore.Mvc;

    public class SampleController : Controller
    {
        public IActionResult Index()
        {
            return View();
        }
    }
}
(2) 加入 Sample\Index.cshtml 建立 View 的過程中 ( [新增檢視] / [Razor檢視], 範本選 Empty ), 會加入 Microsoft.VisualStudio.Web.CodeGeneration.Design 6.0.11 的套件.
@{
    ViewData["Title"] = "Sample Index";
}

<h1>Sample Index</h1>
步驟_5: 註冊介面與類別的對應
在 Program.cs 註冊介面與類別的對應.
using ASPNetCore6LifeTime.Interfaces;
using ASPNetCore6LifeTime.Services;

var builder = WebApplication.CreateBuilder(args);

// Add services to the container.
builder.Services.AddControllersWithViews();

// 註冊 (register) 3 個介面的實作, 並 using 相關的命名空間
builder.Services.AddTransient<ITransientService, SampleService>();
builder.Services.AddScoped<IScopedService, SampleService>();
builder.Services.AddSingleton<ISingletonService, SampleService>();

var app = builder.Build();
步驟_6: 在 SampleController 加入含有傳入各介面作為參數的建構子
在 SampleController 加入含有傳入各介面作為參數的建構子.
private readonly ILogger<SampleController> _logger;
private readonly ITransientService _tranService1;
private readonly ITransientService _tranService2;
private readonly IScopedService _scopedService1;
private readonly IScopedService _scopedService2;
private readonly ISingletonService _singletonService1;
private readonly ISingletonService _singletonService2;

public SampleController(ILogger<SampleController> logger,
    ITransientService tranService1,
    ITransientService tranService2,
    IScopedService scopedService1,
    IScopedService scopedService2,
    ISingletonService singletonService1,
    ISingletonService singletonService2)
{
    _logger = logger;
    _tranService1 = tranService1;
    _tranService2 = tranService2;
    _scopedService1 = scopedService1;
    _scopedService2 = scopedService2;
    _singletonService1 = singletonService1;
    _singletonService2 = singletonService2;
}
步驟_7: 修訂 SampleController 的 Index() 及對應的 View
(1) 修訂 SampleController 的 Index(): 呼叫各個物件實體的 GetCurrentGUID() method, 並透過 ViewBag 物件, 傳送給 View.
public IActionResult Index()
{
    ViewBag.transient1 = _tranService1.GetCurrentGUID().ToString();
    ViewBag.transient2 = _tranService2.GetCurrentGUID().ToString();
    ViewBag.scoped1 = _scopedService1.GetCurrentGUID().ToString();
    ViewBag.scoped2 = _scopedService2.GetCurrentGUID().ToString();
    ViewBag.singleton1 = _singletonService1.GetCurrentGUID().ToString();
    ViewBag.singleton2 = _singletonService2.GetCurrentGUID().ToString();
    return View();
}
(2) 修訂 Sample/Index.cshtml
<div class="text-center">
    <table class="table table-bordered">
        <thead>
            <tr>
                <th>Service Type</th>
                <th>First Instance Operation ID</th>
                <th>Second Instance Operation ID</th>
            </tr>
        </thead>
        <tbody>
            <tr>
                <td style="background-color:#e0ffdc;">Singleton</td>
                <td style="background-color: #e0ffdc">@ViewBag.singleton1</td>
                <td style="background-color: #e0ffdc">@ViewBag.singleton2</td>
            </tr>
            <tr>
                <td>Scoped</td>
                <td>@ViewBag.scoped1</td>
                <td>@ViewBag.scoped2</td>
            </tr>
            <tr>
                <td style="background-color: aliceblue">Transient</td>
                <td style="background-color: aliceblue">@ViewBag.transient1</td>
                <td style="background-color: aliceblue">@ViewBag.transient2</td>
            </tr>
        </tbody>
    </table>
</div>
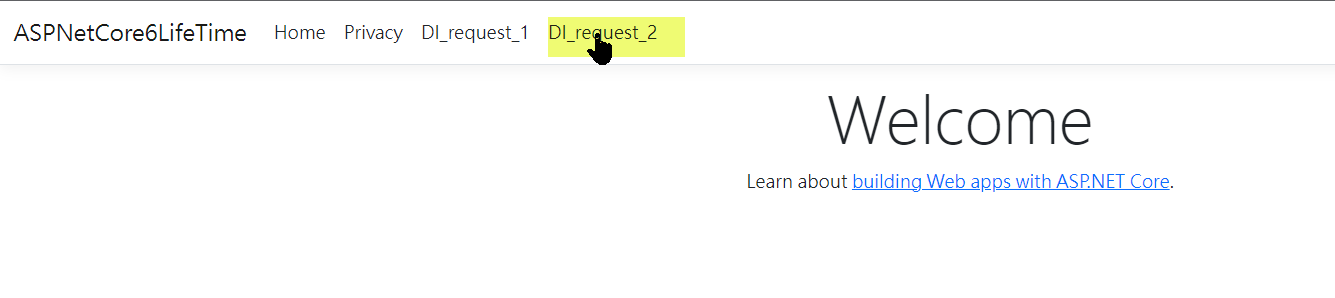
步驟_8: 在 _Layout.cshtml 加入選單項目, 以利進行不同 HTTP REQUEST 測試
在 _Layout.cshtml 加入選單項目, 以利進行不同 HTTP REQUEST 測試.
<li class="nav-item">
    <a class="nav-link text-dark" asp-area="" asp-controller="Sample" asp-action="Index" target="_blank">DI_request_1</a>
</li>
<li class="nav-item">
    <a class="nav-link text-dark" asp-area="" asp-controller="Sample" asp-action="Index" target="_blank">DI_request_2</a>
</li>
步驟_9: 進行測試
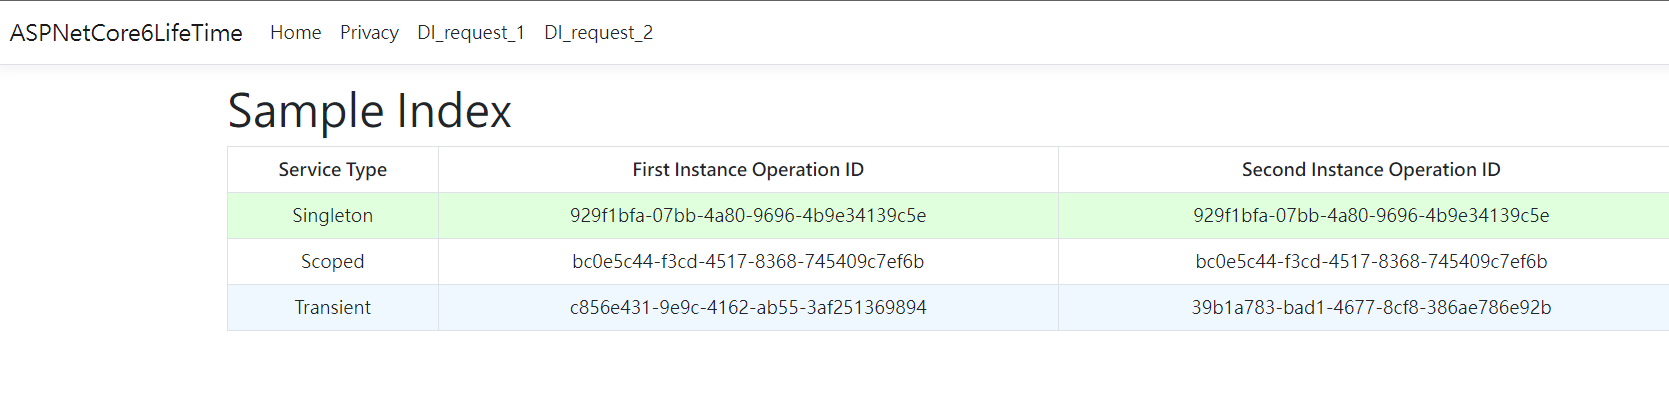
(1) HTTP REQUEST #1

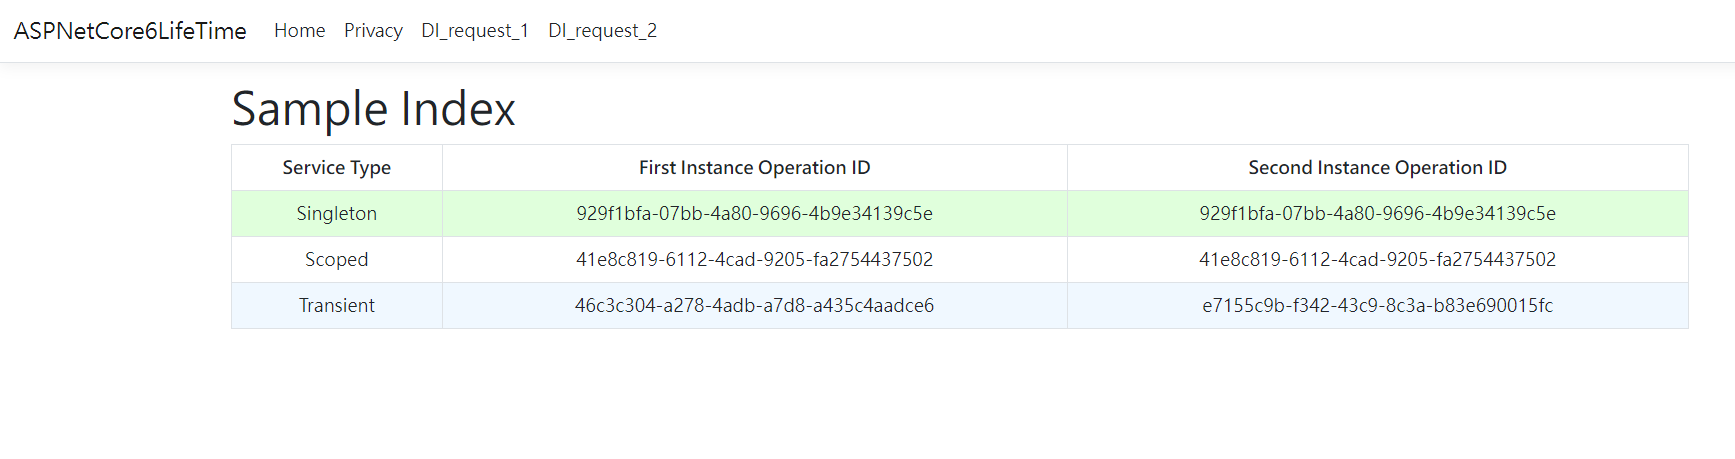
(2) HTTP REQUEST #2
步驟_10: 進行比對
茲將比對結果, 整理如下表格.
| 服務類型 | 同次的 HTTP RQ | 不同次的 HTTP RQ |
|---|---|---|
| Singleton | Same Instance | Same Instance |
| Scoped | Same Instance | New Instance |
| Transient | New Instance | New Instance |
參考文件
[1] (JAYANT TRIPATHY) AddTransient Vs AddScoped Vs AddSingleton Example in ASP.Net Core
沒有留言:
張貼留言